


If you are super-organized, you have managed to complete all your cutting for the quiltalong, and if you are merely human, you are somewhere along the way. I hope you are excited about starting to stitch! But before we begin to sew, we have to spend some time thinking about the layout. This is one of those quilts where the main motif (the ogee) cannot be constructed without involving bits from connecting motifs - to make the top of one ogee you are at the same time making the bottom of another ogee. In other words, you can't sew just one at a time. What this means at this stage of the game is that you need to figure out the layout of the whole quilt top before you sew a single seam.
The easiest way to do the layout is to throw all the pieces up on the design wall that you have permanently attached to the wall right beside your sewing machine, organize them into the layout you like best; after you sew each seam you can put them back onto the design wall and keep everything organized. What's that you say? You don't have a design wall permanently affixed beside your sewing machine? Then this post is for you!
First, take all the little scraps that I told you to save in the last post. (If you haven't yet done your cutting, save small scraps of each fabric about an inch square or so). Tape or glue each scrap to a piece of paper and number each scrap from one to twenty.

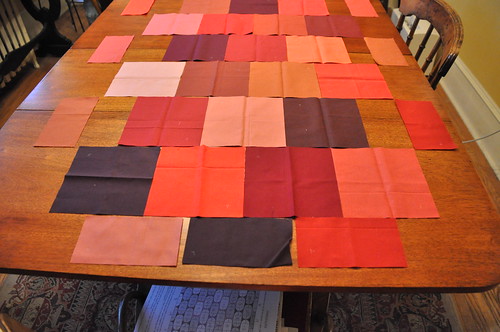
Next, take the 32 large squares that you cut and lay them out on a table or other workspace. If you look at the layout diagram on page 3 of the pattern, you can see that the pattern has five rows of four complete ogees and four rows of three complete ogees. These complete ogees are bordered by half-ogees all the way around. So to figure out your fabric layout in a constrained space, we can work with the large squares only, to give us an idea of how the fabrics will work together. Lay them out offset in rows of four and three. Try to lay them out so that the squares (which will be the centres of the ogees) have neighbours that are not too similar in colour or value. I'm sorry that my table is in the same colour family as these fabrics - it's difficult to see some of them.
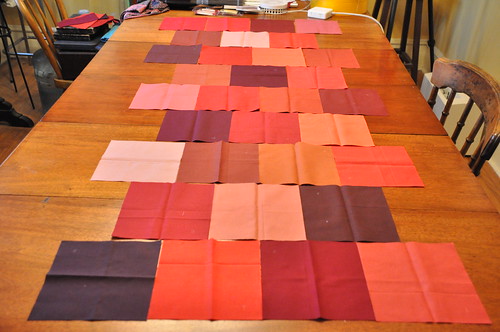
Place the rectangles around the sides on the rows with three squares - these are the half-ogees, so you will have to leave a little space on the sides (but not on the top and bottom), as I have done in the photo below. Keep looking at the layout diagram on page 3 and you will see what I mean.
Now, take the diagram on page three of the pattern and, cross-referencing the key you made with your fabric scraps, transfer the layout from your table onto the diagram via the numbers of each fabric.

This is now your guide to assembling the quilt top, so you don't need to keep the individual pieces out on the table or on a design wall. Here's the one I made for my first ogee quilt. It will be your guide to piecing the fabric you need for the curved seams. Keep it in a safe place for the next week or so while we practice sewing curved seams!
Coming soon:
This weekend just past I made an instructional video about sewing curved seams without pins! I'll be posting that next week.

Also - the Blogger's Quilt Festival starts on Friday! I hope you will all join in the fun! This will be my third one, and I will enter Miss March, since it is my latest finished quilt and the one I a still most in love with.


1 comments:
ACK! I'm already behind! Can I call a minor pass because my grandmother, the quilt recipiant, is in town, and I've hidden the fabric so she can't see it? lol! I'll catch up soon, promise!
Post a Comment
Thanks for dropping by - I'd love to hear what you think, so please leave me a comment!