


Last week I made a video about how I sew curved seams without pins. It was my first video ever, and I did it several times before I felt like it was good enough to post. Without too much rabbiting on by yours truly, and with a decent view of what was actually happening under the needle. I uploaded it to Vimeo and when I watched it afterwards it was completely sideways! I was mortified! And despite all my research to this end, I couldn't figure out how to rotate it so that it would play with the proper orientation. I was resigned to making another video, but in accordance with Murphy's Law, my camera took that moment to lose the spring on the slot that holds the memory card. This meant that the card wouldn't click into place, making the camera unusable. So I took my still-under-warranty camera in for service - which means I can't make another video to demonstrate pinless curved seams.
So! I am uploading the sideways vid. If you have a laptop you can hold it sideways or prop it on its side with a can of peas. If you are watching on a desktop, I suggest you lie on the couch, or perhaps channel your elementary school self and sprawl on your table with your head on your arm, the way we used to do in school when the teacher was reading aloud. That will give you a good angle on this video.
Untitled from L Woolley on Vimeo.
What I didn't say in this video is that there are times when things will go off the rails and you make a dog's breakfast of a particular seam. No fear - just employ your reverse sewing skills with your seam ripper and start over. As my mother used to say - as long as you don't cut anything, you can always fix your mistakes.
There are a number of videos on the internet that show you how to sew curves using pins. I don't use pins on curves because I think they give you a false sense of security, and they cause more problems than they solve. I find they are awkward on small pieces of fabric (perhaps the small applique pins would work here, but I don't have any of those), and I don't want to have to stop a million times to remove pins as I sew. Also, if you pin the pieces together, you are necessarily going to have the pinned seam curl up on itself as you are sewing, and I find that makes it awkward to see what is going on under the needle. Finally, I prick myself with the pins and pins fall out onto the carpet, never to be seen again (until they are stepped on) and that just makes me cranky. However, if you do choose to go with pins, then carefully place pins at both end of the seam. Match the centre points that you marked when you cut from the template and place a pin there. Then place pins along the remaining edge, distributing the fabric evenly. Place the pins perpendicular to the seam line with the pin heads to the right - this will make it easier to remove them as you sew.
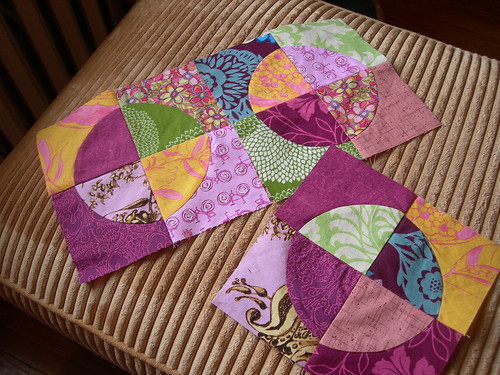
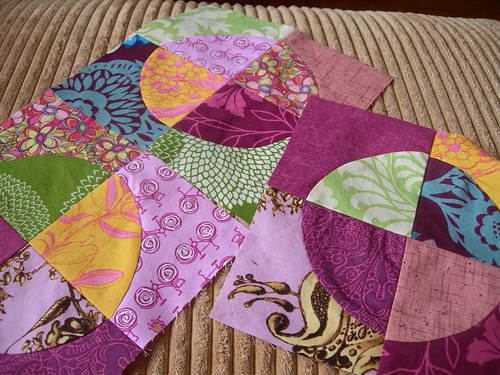
I suggest that you cut some pieces from scrap and trace Template A and B on them, and then practice sewing these curves. I used a small Drunkard's Path template for my practicing, which is similar, but does not mark the curve from corner to corner, as is the case with the ogee blocks. Be courageous! Since you're practicing on scraps, you have nothing to lose. I encourage you to try the no-pins approach, but pins or pin-free, you will soon find that you feel like sewing curves is a breeze!
And if you want to join the Ogee/Curlicue Quiltalong, you can jump in at any time. All the posts will be here.
Also! What? Yikes! I have 200 followers! You are all awesome! And to celebrate I will have a spontaneous giveaway of fat-eighth bundle of Maison de Garance! But not today. Tomorrow! Come back tomorrow and leave your comment on tomorrow's post! (Huh. I guess that's not so spontaneous.)


12 comments:
This is great! I'm without my sewing machine for the next 6 weeks, but I can't wait to get back and try out this method.
Thanks so much for the video. I know seasoned quilters who have not
tried sewing circles yet. I might even bite the bullet and try.
Thanks agian
This is great, Lesly, I've been itching to make a Drunkard's Path. I'm a pinner, but I'm going to give your method a try.
Great video.....I just tilted my head a little. This is one of my favorite methods too.
Thank you for taking the time to make a video! I hate pinning and use basically this method for curves and it works great.
I'm a beginner, and although I'm not quilting along on this project, I do hope to try this in the near future. I thought your tutorial was excellent! I could see everything very clearly, and the verbal instruction was also perfect.
Thank you SO much for the video! I'm stil furiously cutting out template B, but I finally got A all cut. I'm hoping to have everything up on the design wall tonight so I can start practicing curve sewing tomorrow.
Thanks so much for the video.I will try do
Love it, it's different!
Also - you have lovely nails! This was a very helpful video.
Gorgeous! I love these blocks! The fabric and colors are so wonderful! I made a small drunkards path sample in a class eons ago and I know I didn't pin. But when I made my Single Girl quilt...I could sew all the inner curves without pinning, but my outer curves were whoa! wonky! I still don't know how that happened. I love my seam ripper! :)
Great video!
Thanks for the tutorial - totally helped!
Post a Comment
Thanks for dropping by - I'd love to hear what you think, so please leave me a comment!