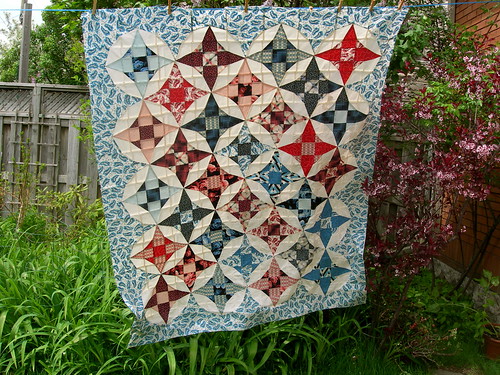
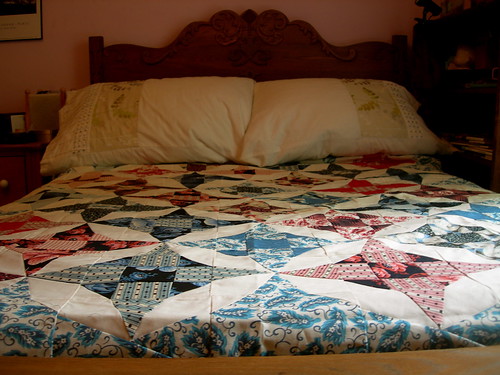
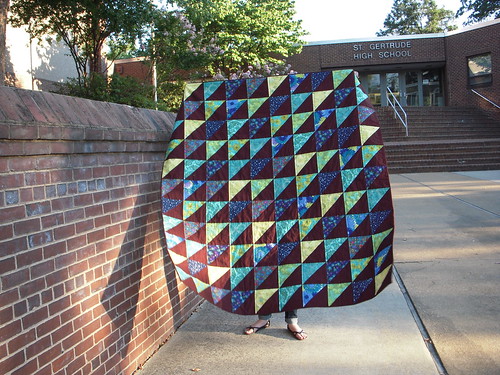
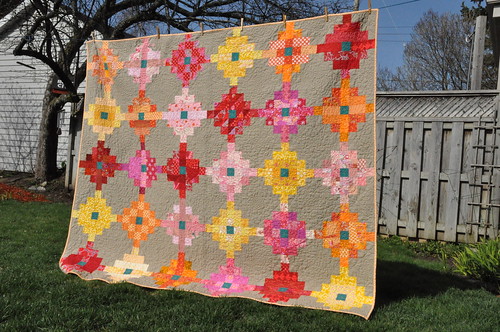
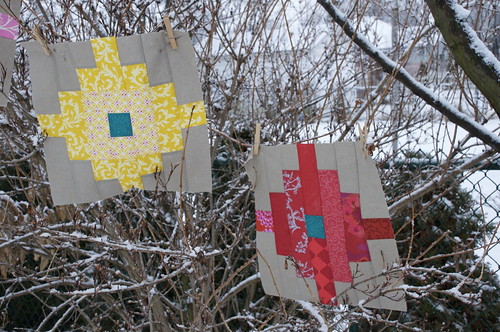
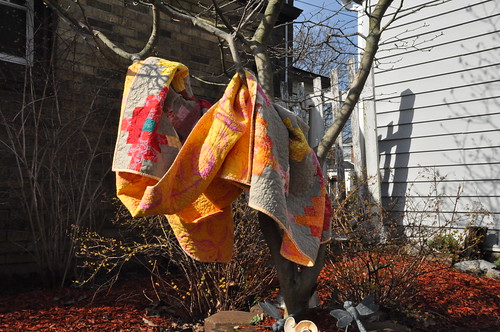
I have something new to show, friends - my entry in the Naked Bed Challenge hosted by Sarah Fielke. The idea is that you have to make a new quilt for your own bed by June 2 (thank goodness the top is sufficient - there's no way I could get this quilted by then!) I decided to make this one here.
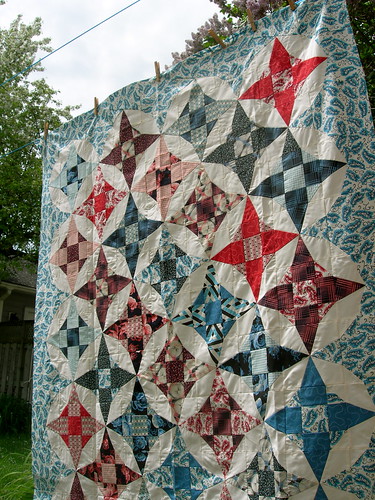
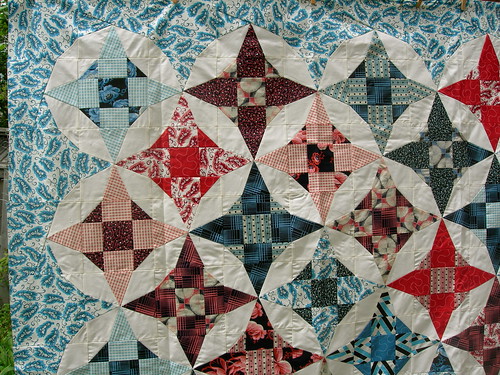
This quilt is from the book by Sharon Sebrow, Kaleidoscope: The Smart Way. I used the SmartPlate ruler, which I have blogged about previously (here is a tutorial on how to use it, and here is the post where I showed the first quilt I made with it). The quilt is a combination of a churn dash block and a kaleidoscope block - very simple, but way more than the sum of its parts! The fabric is Greenfield Hill by Denyse Schmidt, in the red and blue colourways. This was not a popular line, but I really like it. I knew I wanted to make something out of it, and I only love this line more now that I have.
The only thing that is kind of wonky about this quilt is the way that the blades of the kaleidoscope blocks are kind of off-kilter where they meet their match in the blocks with the churn dash. This is due to the way the ruler is used to make the kaleido blocks from pinwheels. It doesn't make me crazy, although they do look a bit drunk, the way some of the prints look tilted. Look at the first one one the left, top row - see how the checkers are oriented one way in the churn dash block but just rotated a bit in the blades of the kaleido block? Also, you can see in the photo below where I screwed up by switching pieces on two of the blocks - they are both dark blue so it isn't too obvious (the two blocks on the far right, 2nd and 3rd rows). I didn't see it until it was too late to fix it without a major overhaul.
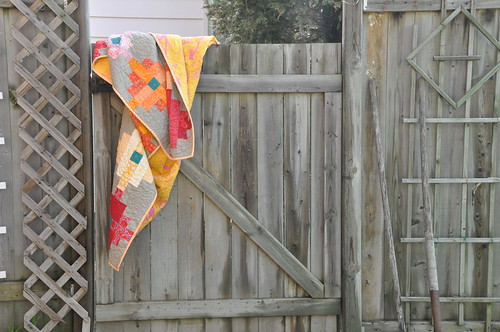
And here's how it will ultimately end up - naked no more!
Oh my word - this is the best giveaway I ever did. The stories that you all left for me about your pets were the funniest, sweetest, and saddest stories I've ever read. It is clear that quilters are big animal lovers! Do yourself a favour and go back to my last post and read the comments, and you'll see what I mean. The winner of the fat-eighth bundle is Molly at BaileyGirl5, and here is her story:
And because it was so very engrossing to read these stories, I'm going to send a bit of swag to two more commenters: Kelsey and Dara. It will be pot luck, ladies - I'm going to dig into my stash and find some bits and pieces to send you.
Thanks for entering, everybody! Now go and hug your dog or cat (or bird or hamster....)!
Folks, Mother Nature is pretty riled up these days. On the news we have seen the results of earthquakes and tusnamis half the world away, and our compassion has stirred many of us to give, to help alleviate the suffering. But let's not forget that our friends here and our neighbours to the south are also getting hit hard. Here in Canada, we have the Manitoba and Quebec floods and the fires in Alberta. In the US, tornados have devastated communities across the South, with loss of life and destruction of property. (I heard on the CBC report a couple of weeks ago, after the tornados in Georgia, that quilts were found miles away from where they had come from - another reason to label your quilts). My friend, Jennifer, has written a heartfelt plea for people to donate money, time or blood to the American Red Cross to help with this latest tornado disaster in Joplin. If you donate, you can enter the giveaway for the gorgeous quilt she is holding in this photo. Read her blog post here and give what you can. (Note to Canadian friends: the American Red Cross website appears to accept only online donations from American credit cards. But if you are feeling you have it in you to give, the Canadian Red Cross has current appeals for the Manitoba and Quebec floods, as well as the Slave Lake fires.)
I missed the sign-up for Sew Mama Sew Giveaway Day this spring. I intended to do it, but with all the things going on right now, it just slipped past me. But that's okay. I do have something to give away, to mark Victoria Day, and also the amazing fact that I now have 200 followers on my blog! I am very grateful to all those of you who read my blog and leave me such lovely comments. You are all wonderful, and I never write a post without finding at least one comment that touches me in some way. I've hosted several giveaways in the past. I've always resisted making people become followers to get more chances to win. So I feel very honoured that those 200 people pressed the Follow button because they liked what they read rather than to increase their odds of winning a few FQs.
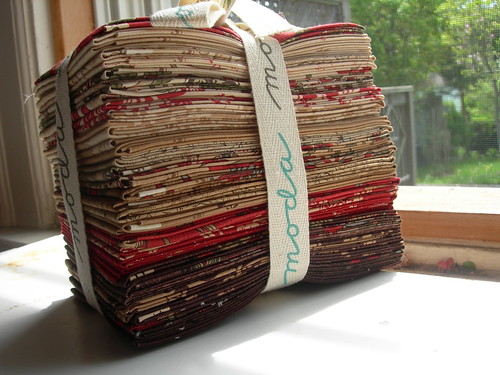
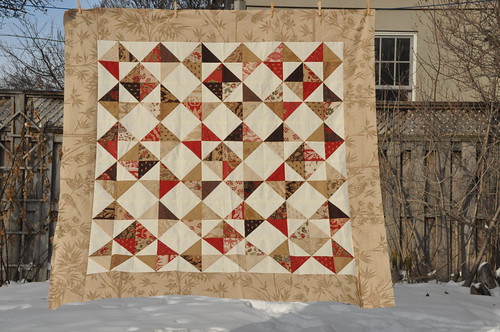
Today's giveaway is a fat-eighth bundle of Maison de Garance by French General. I realized that, after making one quilt with this line, as gorgeous as it is, I'm not likely to make another one - there are just too many new fabrics to play with. I've been been planning to give it away, and today is the day! It's hard to see the fabrics when they are all bundled up like this, but here is the quilt that I made with a couple of charm packs. You can click through to Flickr to see more.
To have a chance at this bundle, please leave me a comment with a crazy or touching pet story. I'll make the draw soon, on Thursday the 26th.
We have had three nice days in a row here in eastern Ontario - our spring has been very slow to catch on here! I haven't broken out the flipflops yet - and since the weather man is talking about rain through the weekend, it won't be this week either.
If you are super-organized, you have managed to complete all your cutting for the quiltalong, and if you are merely human, you are somewhere along the way. I hope you are excited about starting to stitch! But before we begin to sew, we have to spend some time thinking about the layout. This is one of those quilts where the main motif (the ogee) cannot be constructed without involving bits from connecting motifs - to make the top of one ogee you are at the same time making the bottom of another ogee. In other words, you can't sew just one at a time. What this means at this stage of the game is that you need to figure out the layout of the whole quilt top before you sew a single seam.
The easiest way to do the layout is to throw all the pieces up on the design wall that you have permanently attached to the wall right beside your sewing machine, organize them into the layout you like best; after you sew each seam you can put them back onto the design wall and keep everything organized. What's that you say? You don't have a design wall permanently affixed beside your sewing machine? Then this post is for you!
First, take all the little scraps that I told you to save in the last post. (If you haven't yet done your cutting, save small scraps of each fabric about an inch square or so). Tape or glue each scrap to a piece of paper and number each scrap from one to twenty.
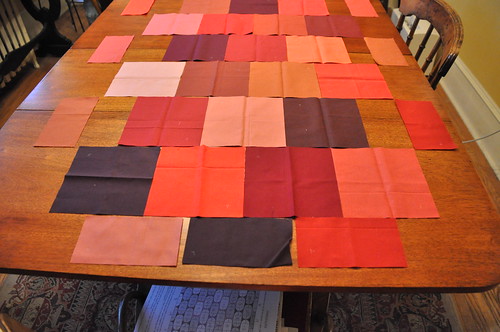
Next, take the 32 large squares that you cut and lay them out on a table or other workspace. If you look at the layout diagram on page 3 of the pattern, you can see that the pattern has five rows of four complete ogees and four rows of three complete ogees. These complete ogees are bordered by half-ogees all the way around. So to figure out your fabric layout in a constrained space, we can work with the large squares only, to give us an idea of how the fabrics will work together. Lay them out offset in rows of four and three. Try to lay them out so that the squares (which will be the centres of the ogees) have neighbours that are not too similar in colour or value. I'm sorry that my table is in the same colour family as these fabrics - it's difficult to see some of them.
Place the rectangles around the sides on the rows with three squares - these are the half-ogees, so you will have to leave a little space on the sides (but not on the top and bottom), as I have done in the photo below. Keep looking at the layout diagram on page 3 and you will see what I mean.
Now, take the diagram on page three of the pattern and, cross-referencing the key you made with your fabric scraps, transfer the layout from your table onto the diagram via the numbers of each fabric.
This is now your guide to assembling the quilt top, so you don't need to keep the individual pieces out on the table or on a design wall. Here's the one I made for my first ogee quilt. It will be your guide to piecing the fabric you need for the curved seams. Keep it in a safe place for the next week or so while we practice sewing curved seams!
Coming soon:
This weekend just past I made an instructional video about sewing curved seams without pins! I'll be posting that next week.
Also - the Blogger's Quilt Festival starts on Friday! I hope you will all join in the fun! This will be my third one, and I will enter Miss March, since it is my latest finished quilt and the one I a still most in love with.
I know that not everyone has finished their cutting, but I'm going to keep more or less to schedule and post today about sewing the curved seams. That is the first step in assembling the quilt top. However, since the curved seams are what brings trepidation to the souls of many, my suggestion is that we take some time to practice sewing these curves before we commit to putting our special fabric under the needle. After all, it took so long to mark those templates and cut out all those pieces - am I right? - that we want to feel confident before we start sewing them up. Here are some Drunkard's Path blocks I made to sharpen up my curved seam sewing before embarking on my second ogee quilt.
Last week I made a video about how I sew curved seams without pins. It was my first video ever, and I did it several times before I felt like it was good enough to post. Without too much rabbiting on by yours truly, and with a decent view of what was actually happening under the needle. I uploaded it to Vimeo and when I watched it afterwards it was completely sideways! I was mortified! And despite all my research to this end, I couldn't figure out how to rotate it so that it would play with the proper orientation. I was resigned to making another video, but in accordance with Murphy's Law, my camera took that moment to lose the spring on the slot that holds the memory card. This meant that the card wouldn't click into place, making the camera unusable. So I took my still-under-warranty camera in for service - which means I can't make another video to demonstrate pinless curved seams.
So! I am uploading the sideways vid. If you have a laptop you can hold it sideways or prop it on its side with a can of peas. If you are watching on a desktop, I suggest you lie on the couch, or perhaps channel your elementary school self and sprawl on your table with your head on your arm, the way we used to do in school when the teacher was reading aloud. That will give you a good angle on this video.
What I didn't say in this video is that there are times when things will go off the rails and you make a dog's breakfast of a particular seam. No fear - just employ your reverse sewing skills with your seam ripper and start over. As my mother used to say - as long as you don't cut anything, you can always fix your mistakes.
There are a number of videos on the internet that show you how to sew curves using pins. I don't use pins on curves because I think they give you a false sense of security, and they cause more problems than they solve. I find they are awkward on small pieces of fabric (perhaps the small applique pins would work here, but I don't have any of those), and I don't want to have to stop a million times to remove pins as I sew. Also, if you pin the pieces together, you are necessarily going to have the pinned seam curl up on itself as you are sewing, and I find that makes it awkward to see what is going on under the needle. Finally, I prick myself with the pins and pins fall out onto the carpet, never to be seen again (until they are stepped on) and that just makes me cranky. However, if you do choose to go with pins, then carefully place pins at both end of the seam. Match the centre points that you marked when you cut from the template and place a pin there. Then place pins along the remaining edge, distributing the fabric evenly. Place the pins perpendicular to the seam line with the pin heads to the right - this will make it easier to remove them as you sew.
I suggest that you cut some pieces from scrap and trace Template A and B on them, and then practice sewing these curves. I used a small Drunkard's Path template for my practicing, which is similar, but does not mark the curve from corner to corner, as is the case with the ogee blocks. Be courageous! Since you're practicing on scraps, you have nothing to lose. I encourage you to try the no-pins approach, but pins or pin-free, you will soon find that you feel like sewing curves is a breeze!
And if you want to join the Ogee/Curlicue Quiltalong, you can jump in at any time. All the posts will be here.
Also! What? Yikes! I have 200 followers! You are all awesome! And to celebrate I will have a spontaneous giveaway of fat-eighth bundle of Maison de Garance! But not today. Tomorrow! Come back tomorrow and leave your comment on tomorrow's post! (Huh. I guess that's not so spontaneous.)
I don't know why I feel compelled to have he first words out of my (virtual) mouth be "Please overlook my bad housekeeping" - nevertheless, please do!
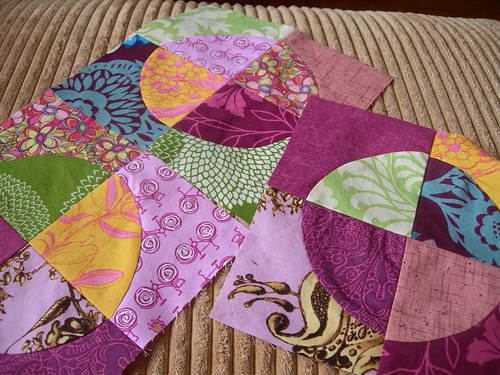
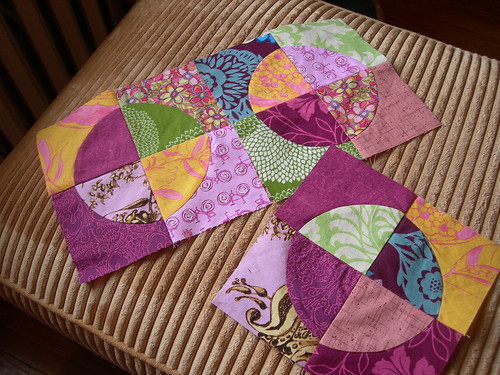
Because it has gotten so big, I couldn't find a better place to lay out my English paper-pieced diamonds in order to snap an update photo. I started working on this in the middle of August of last year. They are made using 1.5" plastic templates (I use Quilt Patis brand). I have enough diamonds cut to extend it probably one side's worth of diamonds and then I'm going to stop and turn my hand to finishing the quilt. Jessica said she appliques the pointy edges of the diamonds to a piece of fabric with a straight edge that you can then put a binding on. Sounds good to me, but it's going to be a lot of hand sewing! I'd better get to it - I'd love to have it done before August rolls around, but I think that's unlikely!
To see more EPP diamonds, check out our Flickr group here!
It is a very happy day here, since, after weeks of agonizing, my daughter has finally decided in favour of McGill University in Montreal, the most beautiful city in North America (and thankfully, only a three-hour train ride away). My husband and I are both alums of McGill, so we are thrilled that she has chosen to wear "the red and white sweater, the dirtier the better"!
Let's fade out with a rousing chorus of the song by E. Wallace Willard Jr. (Arts, 1923).
When James McGill set out to found a university
He often used to wonder what sort of place 'twould be
But when he reasoned to himself within his heart of hearts
He knew the proudest place would be the Faculty of Arts
Arts, Arts, a wonderful place is Arts.
So banish cares and troubles 'til the dawning.
We shall pass the bowl along and we'll sing a joyous song,
'Cause we don't get up for classes in the morning!
My regular readers may say ho-hum when they see this post, since I wrote about this quilt when I finished it just a week or so ago. But I am so in love with it that I knew it had to be my entry into the Blogger’s Quilt Festival this spring.
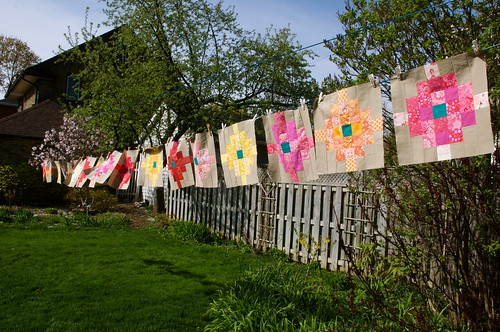
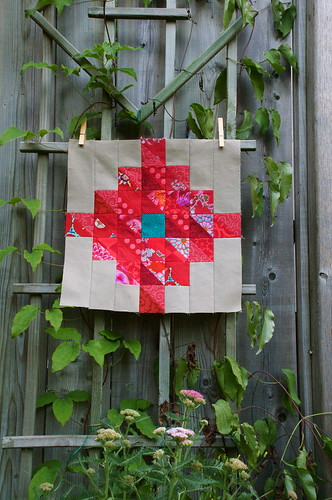
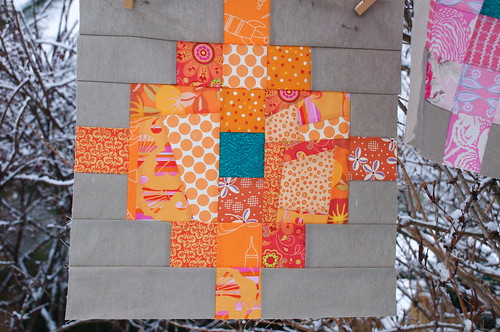
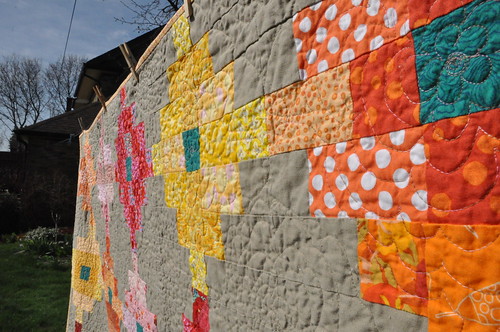
The name of this quilt is Miss March. March 2010 was my month for sending out fabric to the ladies in the Modern Tradition Quilt Bee. I sent everyone a bunch of fabric in two different colourways and asked for two monochromatic blocks.
The pattern is based on a traditional one – I found it here – which is made with 2.5” strips of different lengths surrounding a centre square. I wanted to update it a bit and also to allow my bee buddies to have scope for their imagination. So I asked them to use the teal square in the centre, but to have a party in the coloured bits.
I was so excited by what they did! One of the blocks has some tiny four-patch mini-blocks that measure 2.5”. One is made entirely of half-square triangles.
One has large panels made of improv/crazy piecing.
Some are made entirely from strips, some are made entirely from squares, and some are an energetic mixture of both!
The talents of all these bee quilters were really in evidence – I was thrilled. And fortunately I also had help with the assembly of all the blocks.
I used Essex linen-cotton blend in Putty for the background. It was okay for piecing, but when it came to quilting it stretched like a fiend. I like the contrast in colour and texture with the background and the flowers.
I chose this pretty Tina Givens print for the back. I think it’s perfect!
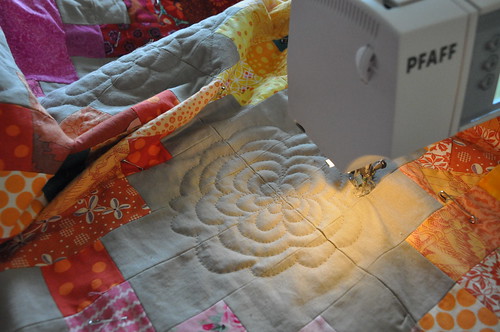
And to add to the excitement that I feel over this quilt, it is also the first time I have ever tried to do an actual motif-doodah in my FMQ. Normally, I do variations of an allover, more or less swirly quilting meander. But this time I knew that those large spaces left by the linen called out for something special.
I used, more or less successfully, a kind of flower motif that looks like some kind of chrysanthemum on steroids. Thankfully, once the quilt was washed, it became harder to see that some of those flowers looked like hamsters after a binge weekend. Overall, though, I was pleased with the quilting and am encouraged to continue to challenge myself in that domain.
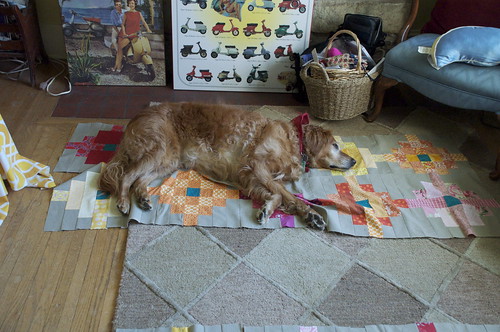
This one is going on my bed. I’m glad to have a new quilt to replace the one I’ve been using for so many years – I made it when I was pregnant with my daughter in 1993! After all those years of wear, including two sets of two dogs who loved to lounge on it, it was ready to retire. Miss March is a worthy replacement!
I’m glad to have the chance to feature this in Amy’s Blogger’s Quilt Festival. I’m excited to see what everyone else is showing this time!
I love the fabric choices that folks have posted in the Flickr group so far! If you are quilting along, I encourage you to post photos of your fabric. If you don't do Flickr but have photos on a blog, let me know in a comment so I can link up and share with the other QAL-ers. Now it's time to get cutting!
EDITED TO ADD: This is very important, folks! When you are printing your .pdf pattern, make sure it does not scale the pattern to fit the page (there is usually a check box asking if you want this in the printing process - on some printers it is the default to be selected. Deselect it, if this is the case for your printer.) Template A and Template B on the pattern must fit the small squares that you cut in step 3 below. If you do not follow these instructions, your A and B pieces will be too small!
It's a bit tricky; since this is a proprietary pattern, it would be very poor form for me to post photos that would make it possible for people to easily make he quilt without buying the pattern. So the photos I am showing here are necessarily a bit abbreviated, but I think they will help with the points I want to make.
First, I want to say that the instructions in Rebecca's pattern are very good, so if you follow them to the letter, you won't go wrong. However, you should know that this is definitely the time to apply the rule "measure twice, cut once". If you make a mistake in your cutting, and if you are cutting from fat quarters with no backup yardage, you are SOL. Not to scare you, or anything, ha ha. So in this post, I want to point out some things to look for so you don't go wrong.
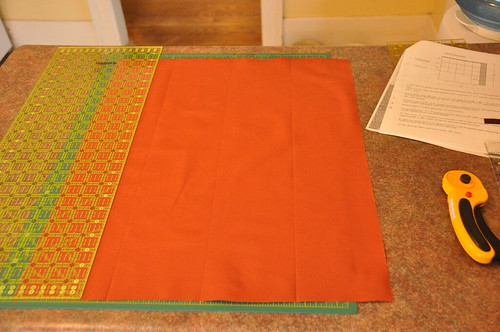
1. As I said in a previous post, begin by measuring your FQs. Different shops are more or less generous in their cutting. A stingy FQ will be 18" on the short side. I am using a Kona solid bundle and these FQs are very stingy: not a hair over 18". This means I have very little scope for straightening up the cut, since the calculated waste on the 18" side is only 1/2". If you have more generous FQs, you can breathe a bit more freely.
2. You want to begin by cutting 1 wide strip and 3 narrow strips from each FQ (the width dimensions of the strips are in the pattern). The FQ will be 18" x 20-22". Make sure you cut the strips so that they are 20-22" long. If you cut them 18" long you will not have enough fabric. In this picture I have the ruler along the 20" side.
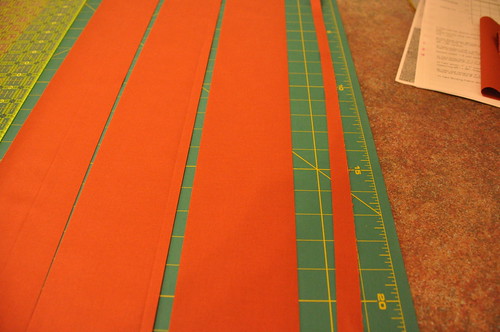
3. Subcut the strips into the pieces that are marked on the pattern. You will end up with 17 small squares and 2 large squares. Here you can see the waste from the 18" side when cutting the strips: that 1/2" strip on the right side of the cutting mat.
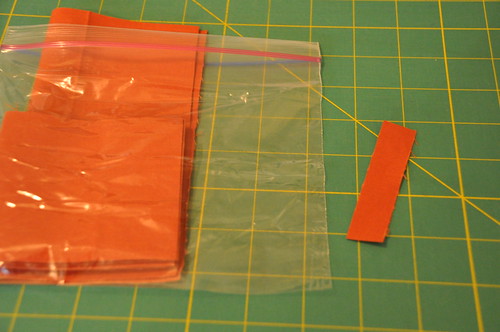
4. After I cut each FQ, I am keeping the pieces together in a plastic sandwich bag. (The reason I am doing this is that some of the Kona solids are very similar in colour, and I don't want to get them mixed up. If your fabrics aren't too similar, keeping them in separate bags isn't really necessary.) NOTE: From a piece of the waste fabric, cut a small swatch and keep it safe. You will use this when you are planning the layout of the quilt. This is not in the pattern, but it is something that I found extremely helpful when I made my first Ogee quilt, since I don't have a design wall that I can leave up for extended periods. Here you can see the the size of swatch I have preserved. I keep it in the plastic bag with the other pieces from the FQ.
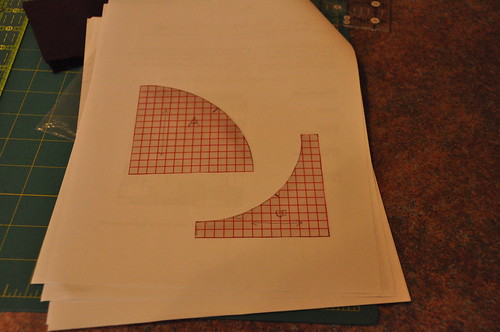
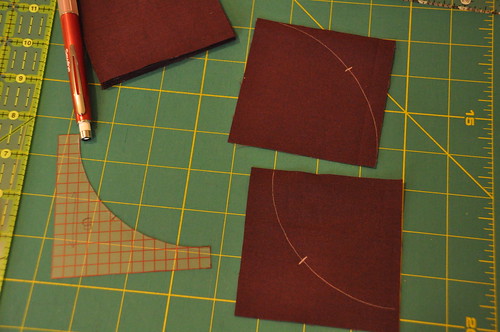
5. The pattern provides two templates for you to use to cut the curved pieces. I used some Dritz template plastic to trace the pattern pieces onto with a smudge-proof pen.
This plastic is fairly thick and I like it, but any reasonably stiff plastic or even cardboard can be used. When you cut the templates out, be sure and transfer the marks at the centre of the curve onto the template with a pen. Cut them carefully out with scissors.
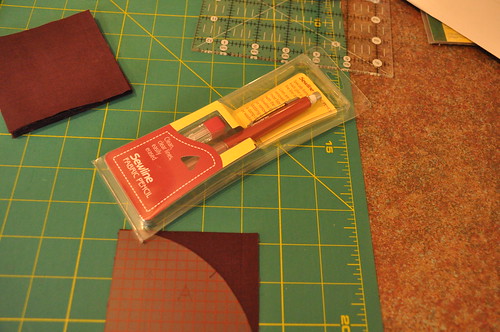
6. Fit one of the curved templates onto one of small squares that you cut from the FQ, and trace around with a sharp pencil. I used a regular mechanical pencil when I made my first Ogee quilt, but I am using this Sewline fabric pencil with white lead for this one, since so many of my fabrics are dark.
The pattern will tell you how many of Template A and Template B to cut from each FQ (see Step 3 on the pattern). Be sure and mark the centre point of the curve.
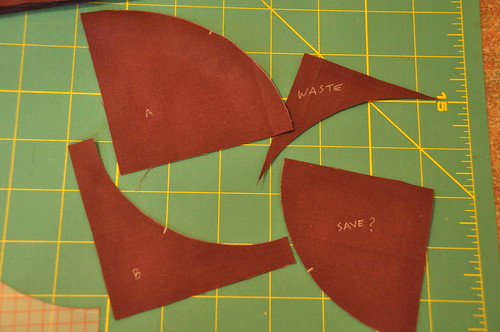
7. Cut along the marked line carefully. Here's what you will have after you have cut out one Template A and one Template B. I pitch the leftover from Template A (marked "Waste"). I save the segment that remains after cutting Template B - marked "Save?" - the question mark means that it's up to you to save or not. It is not required for the Ogee/Curlicue pattern, but I think you could probably do something interesting with them. You will have a lot of them when everything is cut out.
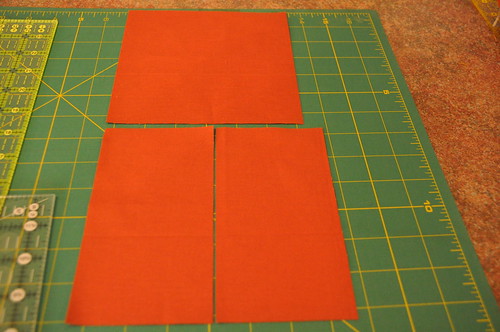
8. After your initial cutting of the strips into squares, you will have 2 large squares from each FQ. Since the pattern calls for 20 FQs, you will have 40 large squares in total. Pick 32 of these for the main ogees in the pattern. Step 4 of the pattern says to trim each of these 32 large squares down to slightly smaller squares (see the Step 4 of the pattern for the precise dimension). Of the remaining 8 large squares, pick one for your corners and set it aside. NOTE: This next bit is where I started off wrong when I made the pattern the first time. With the remaining 7 squares, trim ONE SIDE ONLY - the pattern will tell you how much (I went hog wild and continued to trim on both sides, because I didn't read the pattern carefully). At that point, cut that piece in half to form two equal rectangles (again, the precise dimensions are in Step 4 of the pattern). In the photo below, you can see what happens to the two large squares of a FQ: the one on top will be one of the 32 main ogees and has been trimmed to a slightly smaller square. The one on the bottom has been trimmed on one side only, and then bisected into two rectangles. The photo looks elongated because I was at an angle - sorry!
9. The last large square that you set aside in that FQ will be cut into four equal squares - the pattern will tell you the exact dimensions (see Step 6). These will be the corners of your quilt top. No photo for this step.
Done! Phew! Have fun cutting! And don't forget to post photos if you haven't already!
And if you aren't quilting along but you read through this entire post, here is your reward: